"Helping woodworkers online for over 20 years"
Making and Mounting Shelves
| Mounting Shelves
Everyone at one time or another has had to put up a shelf, there are many ways of mounting a shelf to a wall, the most secure is to find the studs running up the wall and drive screws into them. There are two methods to find a stud in the wall behind the sheetrock. 1. Measure out from the corner and tap on the wall with a hammer at locations in multiples of 16 inches apart, you will hear hollow sounds between the studs and a solid sound at the stud. 2. Use a stud sensor, if you do this often this is the way to go. Sometimes it is not possible to use the studs, the fasteners have to be in a certain spot, this is when anchors are used, in sheetrock walls we can either use a plastic anchor or a metal star anchor. The metal star anchors will support a greater load than the plastic anchors.
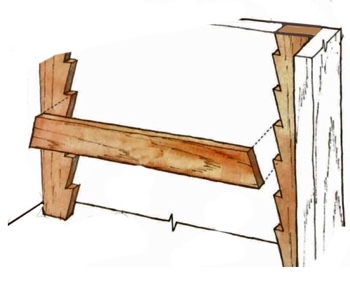
Hanging ShelvesThere are several methods of hanging the shelves, if they have a back screws can be driven through the backing material into studs or anchors. Do not use drywall screws to mount a shelf or
cabinet, they are designed for hanging drywall and do not have the
proper shear strength for any other use. A strip can be placed below the shelf and screws can be driven through it as shown below. Hole plugs can be used to hide the screws. French CleatsTo mount a cabinet on a wall a French Cleat can be made by ripping a 45 degree cut through a wooden strip:
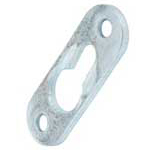
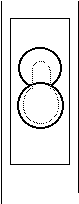
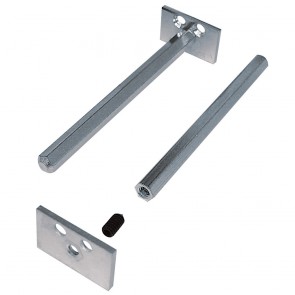
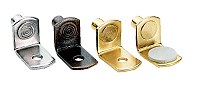
Metal brackets are also available similar to above wooden style. Keyhole SlotsTo mount a shelf that does not have a strip you can use keyhole slots cut in the supports. This can be done with a router with a special bit and a jig, or metal hardware can be used for this. If you don't have a router and use the metal plates you will have to cut an insert for the plate with a chisel and drill out the material for a pocket behind the keyhole.
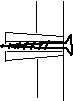
This type of mount hangs on screw heads
that protrude from the wall, if you have to use an anchor
the metal star anchors work best. Insert the anchor, tighten
the screw until the fingers are completely compressed
against the back of the sheetrock, then back the screw out
enough to allow the slot to slide snuggly over the head of
the screw. Two ways to locate mounting screws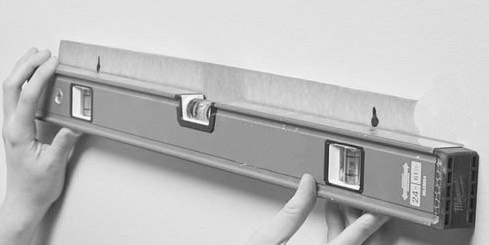
Cover the keyholes with a length of masking tape, with a felt pen fill in the outline of the holes. Lay the tape on the top of a level so it overhangs with the bottom of the keyholes even with the corner. Fold the tape up and place level in position against the wall, press tape to wall and remove from level. Drive screws or drill holes for anchor at the top of the slots, remove tape and hang shelf.
Making Shelves
How shelves are fastened inside a carcass depends on whether they are to be adjustable or mounted in a fixed position. Fixed position shelves can be held in place by cutting dados in the uprights, or by using dowels, nails or screws using a basic butt joint. To make shelves wider than the recommended distance in the span table dividers can be put below the shelves to support the weight. Adjustable shelves are usually done by drilling a series of equally spaced holes in the uprights and then using pins or push in brackets to hold the shelves. For added strength and a finished look metal sleeves can be inserted into the mounting holes.
Bench Notes has a jig for drilling evenly spaced holes that you can make, or another method is to use a strip of peg board to mark the position of the holes.
A traditional way of making adjustable shelves without additional metal hardware is to make sawtooth shelves, uprights with notches cut in them for cross supports are placed in the four corners of the case. The ends of the shelves are notched to sit on top of the cross pieces.
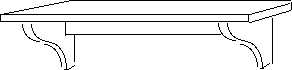
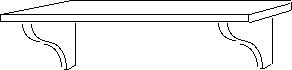
Single wall shelves require a support, this can be either under the shelf or at the ends of the shelf, if the shape of these supports is an ogee, then one cut makes two supports.
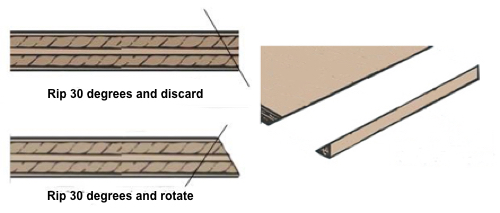
To make a plywood shelf appear to be a solid board tilt you
table saw blade to 30 degrees, make the first cut with the angle toward
the top, the second cut is opposite with the angle toward the bottom,
save this offcut and fasten it to front of shelf with finished surface
exposed. The Woodbin has a very handy calculator to determine the dimensions of a shelf, just plug in your information such as length, width, thickness and weight it has to hold: Simple Shelf Projects
|