Helping Woodworkers Online for Over 20 Years
Table Saws
|
This is probably a woodworkers first major purchase, there are several basic categories of table saws on the market, bench or jobsite, contractor's and cabinet. Though they all are sold with blade guards and guides there are custom products available that offer advantages over the stock parts. There are also many attachments and jigs that can be made for more accurate cuts. Table Saw TermonologyBase - This is basically a shell that contains the working parts of the saw, the trunnions, arbor, adjusting mechanisms and sometimes the motor. The base may extend to the floor as it does with cabinet saws or it may have an open base that sits on legs as a contractor saw or on a bench as a benchtop. Table and Wings - The table may be cast iron, aluminium or granite, it is a flat surface with miter slots machined into it on both sides of the blade. The wings are extensions attached to the table, these may be cast iron, sheet metal or aluminium. Rip Fence and Rails - The rip fence guides the material as it is being ripped, (cut along it's length) and is made to slide across the saw table and be locked on place. The rails are what the fence rides on as it is moved across the table, the longer the rails the wider the material that can be ripped. Miter Gauge - The miter gauge is an adjustable head fastened to a metal bar that sides in the miter slots to guide the material when crosscutting. The head is marked in degrees to allow accurate angled cuts. Arbor - This is the threaded shaft that the blade is mounted in, full size saws have a long enough stub that a standard dado head may be installed, lower powered saws will have a shorter stub so only narrower dados can be cut. The arbor is mounted in an assembly that allows it the be raised or lowered and tilted. Trunnions - The trunnions are semi circular yokes that hold the arbor assembly at each end allowing it to be tilted. They are fastened to the base on cabinet saws and to the under side of the table on most other styles. Motor - This will be from 1- 5 HP, the lower HP models will run on 110 Volt residential circuits, any above 3 HP will require a 220 volt power source. A common problem with running on 110 volt circuits is line loss from running a cord that is too small or too long. The arbor may be connected directly to the motor shaft or driven by a belt arrangement. Replacing Arbor Bearings In A Craftsman Contractor Saw
|
|
Bench Top or Portable A small portable saw, will have a direct drive motor, $500.00 range. There have been great improvements made in these saws in recent years, they are no longer an entry level handyman saw. Some models come with folding stands to set up at the job site. Pros: Portable, reasonable price. Cons: Small work surface, underpowered for some jobs, not as accurate as contractor or cabinet saws. Arbor usually too short for dado blades. |
|
|
Contractor's Saw This is the most common type of table saw, it has most of the features of a cabinet saw. Some are direct drive, most are belt driven. Prices range form $500.00 to $1000.00. Pros: Large work surface, more powerful and accurate than bench top. Cons: Not as powerful as cabinet saws. |
|
|
Hybrid Saw This is a combination of a contractor saw and a cabinet saw Prices range from $900.00 to $1500 Pros: Large work surface, heavy base, powerful motor, very accurate. Cons: Not as heavily built as a good cabinet saw. |
|
|
Cabinet Saw These are for the professional or hardcore woodworker, they are belt driven by large horsepower motors. Prices range from $900.00 to over $2000.00. Pros: Large work surface, heavy base, powerful motor, very accurate. Cons: Price. |
|
-

SawStop Industrial Cabinet Saw
One cut through a thick piece of hard maple is all it takes to feel the massive power of the SawStop Industrial Cabinet Saw. That said, it's amazing to think that it literally wouldn't harm a hot dog, or your finger, if the worst were to happen. With the utmost in precision and heavy-duty construction, plus the revolutionary safety feature that’s made SawStop famous and a dust collection system that’s second-to-none, it is, simply put, the finest SawStop table saw ever made.
Wear Safety glasses or face shield, avoid loose fitting clothing.
Always use a push stick when cutting narrow or short stock.
Use the proper blade for the job, make sure it is sharp and properly set so you don't have to exert extreme force to make the cut.
Make sure guards are in place and in good working condition.
Set blade height to 1/8" (3mm.) above thickness of material being cut.
Ensure fence has been locked into position after setting it.
Hold material down and against the fence when making a cut.
Never use a fence for a cross-cut stop guide.
Never push material with hands in line with the blade, stand to one side in case of kick-back.
Provide adequate support when cutting long or wide material, use extension wings or roller stands.
If a person is helping you make sure they understand to only hold the material and follow your lead as to the movement of the material.
Keep saw and area around it clutter free.
Unplug saw when changing blades or doing maintenance.
Don't reach across or around a running saw blade.
Never leave a running saw unattended, shut it off when leaving the area.
-
Simple Push Stick A push stick can be made from a short length of 1 1/2" X 3/4" stock, make two of them, use one to push the
stock through the saw and the other to hold the stock against the fence. Do not use thin plywood even if it is tempting
for cutting narrow stock, thin wood can break and cause your hand to move down and forward and contact the blade.
As a safety precaution push sticks with a handle similar to a handsaw that trap your hand should not be used. -
Dado Blades
-
- Stacking
-
This style has two outside blades with chipper blades that fill in between them to determine the width of the cut. These are more expensive than the wobbly style but do a cleaner job.
- Wobbly
This style has one blade that is tilted by adjusting rings in the hub so that it wobbles as it spins. Not a fine woodworking piece of equipment, but works well on a radial arm saw for carpentry work, and is much cheaper to buy.
-
-
What is a "Horned Dado"? -
- When using
stacked dado heads the outside blades will cut deeper
than the chipper blades to prevent tearing, producing
a "Horned Dado". Some brands are more pronounced than
others and is usually not noticeable in the finished
product. They have two advantages, providing a channel
for excess glue to escape and clearance for the sharp
corners of the material being inserted. If you have a
problem with excess horns mention it to your sharpener
and get them to correct it.
-
Stacked Dado Gauge -
This can be a rainy day project or done over a period of time, set your dado head up with one chipper, make a cut in a length of 1 1/2" thick hardwood, then add a shim and make another cut, continue by progressively adding shims and chippers and marking the combinations beside the cuts. Cut the dados about 3/8" deep, flip the board over and continue on the other side. When you have to cut a dado find the slot the material fits into and set up the dado head accordingly.
-
-
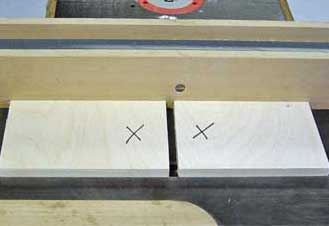
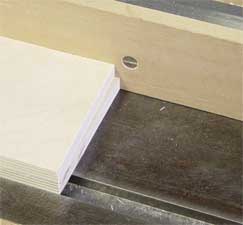
Making Square Cuts
An easy way to check if your saw is cutting square is to make a cut with your miter gauge, then mark the two pieces as shown. Move them so they rest against the table saw fence, making sure that the edge that was against the miter gauge is now against the fence. Flip the board on the right over to rest on the left one, the X's are now facing each other. Any variation in the cut from being square will now be multiplied by two so it will be easier to see. It now becomes a matter of adjusting the miter gauge so that the cut is square. 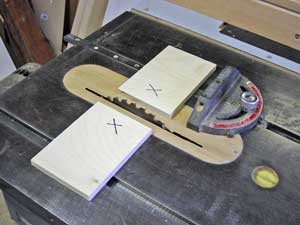

 |
With SawStop's® legendary safety system, uncompromising quality and industry-leading dust collection, the 110V Professional Contractor Saw is engineered to be the cornerstone of a home shop. |